Sunday 22 February 2015

Sonic The Hedgehog Nails

After painting Pokémon on my nails for Valentine's Day I wanted to come up with another game themed nail design. I decided on Sonic The Hedgehog as I used to love playing this game when I was younger. Also you may have noticed my nails are suddenly a lot shorter this week - yesterday I learned you should never go bowling with pointed nails! I was left with broken jagged claws so I have filed them all down and I will have to patiently grow them back again.  The blue base colour I used for this design was OPI's No Room For The Blues and all of the detail was drawn using very fine nail art brushes.

How to get this look:

Apply a base coat and then two coats of a blue polish.

Using a thin nail art brush draw lots of tiny squares in a light brown colour to create a check pattern. Fill in the squares between the light brown with a darker brown colour. Start with two rows of squares or add more rows where you want to create a hill so it is like the landscape of a sonic game.

Using two shades of green draw short vertical lines in alternate colours just on top of the brown squares. Follow the shape of the brown squares and curve the green where you have drawn the hill.

You now have your sonic game landscape so now you need to use a nail art brush to draw Sonic himself. Start by drawing the white circle for the eye and then draw the dark blue shape of the head around the white. Use a light brown or sandy colour for detailing on the body and then draw the blue arms and legs in a running position. Finish off Sonic by drawing a white hand on the end of the arm, put bright red shoes on his feet and add a black dot to his eye.

On the other nails you can use gold nail polish to draw gold rings which Sonic collects in the game or you can draw silver spikes or other obstacles from the game.

Finish by applying a top coat to your nails.


Sunday 15 February 2015

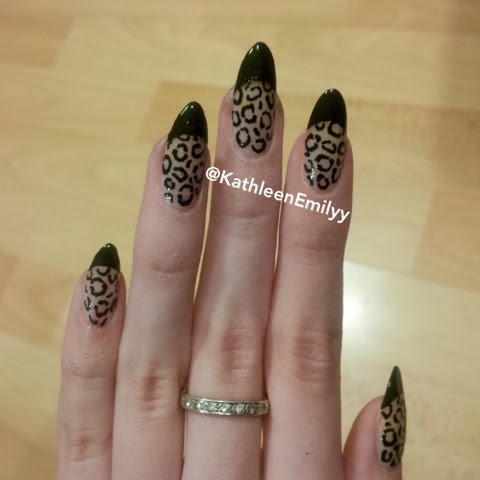
French Leopard

I  came up with this nail design because I wanted to try out a black French manicure. I think French tips look very classy but for me they are a bit plain and boring so I wanted to make it more fun by adding some leopard print. The base colour I used is OPI's Bubble Bath - a pale pink/nude colour that is normally used for regular pink and white French manicures. I drew the leopard print using a black Wah Nails nail art pen and I painted the black tips with Nails Inc's New York Noir. This design would also look good on round or square shaped nails they don't have to be pointed like mine!

How to get this look:

Start by applying a base coat and then a coat of pink or nude polish.

Draw the leopard print using a black nail art pen working from the bottom of the nail up and stop when you get to the top of the nail where the French tip will be. Leopard print is really easy to draw once you get the hang of it - try drawing C's and broken circles and then go back and make the lines thicker and more uneven so they look like leopard spots.

If there are empty gaps around and between your leopard spots fill the space in with black dots or short squiggles.

When you have covered the bottom of your nail in leopard print use a black nail polish to draw the French tips. You draw a French tip by painting across the nail horizontally starting at one side and moving across to the other side; if the line is not quite straight you can do a second stroke in the opposite direction to even it out and create a smooth line across the nail. The French tip should just cover the top of some of your leopard spots so you will be left with some half spots disappearing under the tip.

Finish off by applying a top coat.

Sunday 8 February 2015

Hearts On Point

This is my second nail art design for Valentines Day. This design works best on pointed or stiletto nails so that the point at the bottom of the heart uses the tip of the nail as its outline. This design is really easy and you don't need any nail art pens or brushes, just use your favourite pink or red polish to paint the hearts! I wanted to create something pretty and super sparkly so the base polish I used was OPI's Turn On The Haute Light. This is a silver polish from the Coca-Cola collection, it is definitely my favourite silver polish as it is very shiny and it gives good coverage unlike most glitter polishes that need numerous coats. On top of the silver I applied one coat of OPI's In True Stefani Fashion which is a silver polish with small to medium size pieces of glitter in it - with a coat of glitter on top it makes this silver polish amazingly sparkly so I would recommend using these two polishes together to make a good combo.

How to get this look:

Apply a base coat and then two coats of your base colour, I used OPI's silver Turn On The Haute Light. Optionally apply one coat of a glitter polish over the silver to make your nails ultra shimmery.

Using a red or pink polish carefully draw the heart one half at a time. Make sure the heart outline follows the shape of your nail at the tip. Try to draw each half of the heart in one smooth stroke starting at the rounded top and moving inwards toward the tip and then repeat on the other side to make a full heart.

Finish by applying a top coat.


Pokémon Valentine Nails

It's nearly Valentines Day so I wanted to do some Valentine themed nails. I love Pokémon and I thought it would be fun to create a nail design with cute poké-puns. 

How to get this look:

Start with a base coat and then two coats of OPI's Alpine Snow.

Draw the pokemon at the bottom of the nail but make sure you leave enough room at the top to fit the text in. I drew all the pokemon using a very fine nail art brush. (Tip - you can get sets of nail art brushes really cheap on ebay!)

The lettering is drawn on using a black nail art pen, you should practice writing with it on paper first to get the pen running smoothly to achieve thin lines. The nail art pen I used was from Models Own.

Finish by applying a top coat, you should dab it on to the nail rather than dragging the brush across the nail as the black polish will smudge very easily on a white base even if it has dried.

If you recreate this design please share it with me - @KathleenEmilyy on both Twitter and Instagram.